Quick Start
This section describes a low-overhead way to get started with OnRamp. It brings up a one-node Kubernetes cluster, deploys a 5G version of SD-Core on that cluster, and runs an emulated 5G workload against the 5G Core. It assumes a low-end server that meets the following requirements:
Haswell CPU (or newer), with at least 4 CPU cores and 16GB RAM.
Clean install of Ubuntu 20.04 or 22.04, with 5.15 (or later) kernel.
For example, something like an Intel NUC is likely more than enough to get started.
While it’s possible to use OnRamp to deploy Aether on a laptop (e.g.,
in a VirtualBox VM), because the goal is to eventually scale a
deployment and/or run Aether 24/7, OnRamp has been developed and
tested on physical servers and server-based VMs. The latter includes
Proxmox (see the example configuration shown in Figure 47); AWS (specify a t2.xlarge instance); and CloudLab
(specify either a small-lan or single-pc-ubuntu instance).
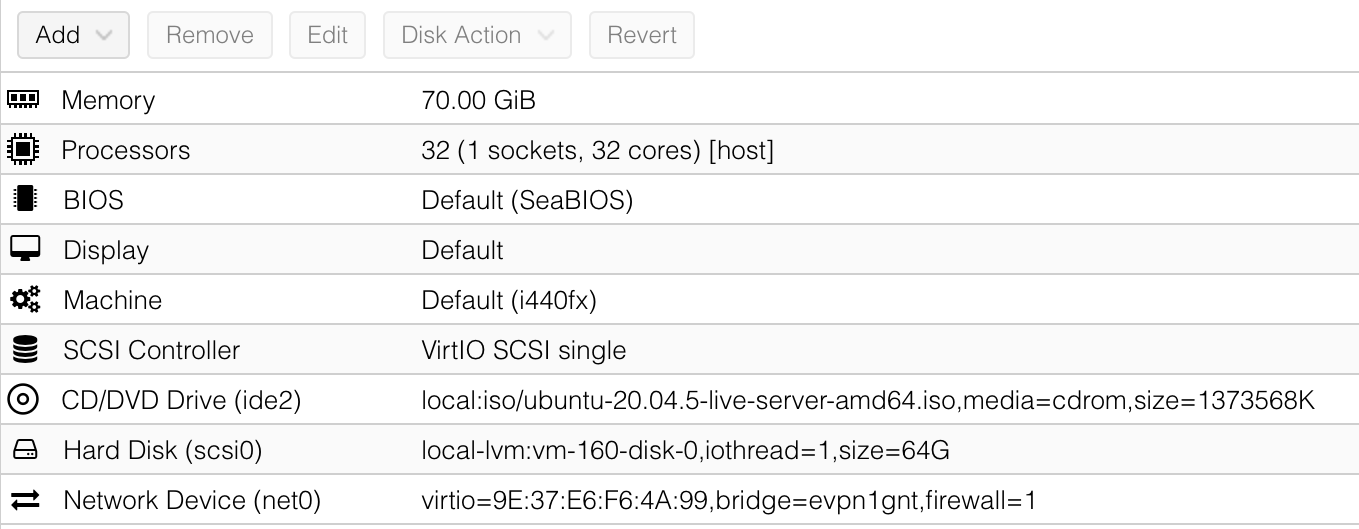
Figure 47. Example configuration of Proxmox VM.
Prep Environment
To install Aether OnRamp, you must be able able to run sudo without
a password, and there should be no firewall running on the server. You can
verify this is the case by executing the following, which should
report Status: inactive:
$ sudo ufw status
Status: inactive
Your server should use systemd-networkd to configure the network, which you can verify by typing:
$ systemctl status systemd-networkd.service
Note that Aether assumes Ubuntu Server (as opposed to Ubuntu Desktop), the main implication being that it uses systemd-networkd rather than Network Manager to manage network settings. It is possible to work around this requirement, but be aware that doing so may impact the Ansible playbook for installing SD-Core.
OnRamp depends on Ansible, which you can install on your server as follows:
$ sudo apt install pipx
$ sudo apt install python3.8-venv
$ pipx install --include-deps ansible
$ pipx ensurepath
$ sudo apt-get install sshpass
Once installed, displaying the Ansible version number should result in output similar to the following:
$ ansible --version
ansible [core 2.11.12]
  config file = None
  configured module search path = ['/home/foo/.ansible/plugins/modules', '/usr/share/ansible/plugins/modules']
  ansible python module location = /home/foo/.local/lib/python3.6/site-packages/ansible
  ansible collection location = /home/foo/.ansible/collections:/usr/share/ansible/collections
  executable location = /home/foo/.local/bin/ansible
  python version = 3.6.9 (default, Mar 10 2023, 16:46:00) [GCC 8.4.0]
  jinja version = 3.0.3
  libyaml = True
Note that a fresh install of Ubuntu may be missing other packages that
you need (e.g., git, curl, make), but you will be prompted
to install them as you step through the Quick Start sequence.
Download Aether OnRamp
Once ready, clone the Aether OnRamp repo on this target deployment server:
$ git clone --recursive https://github.com/opennetworkinglab/aether-onramp.git
$ cd aether-onramp
Taking a quick look at your aether-onramp directory, there are
four things to note:
The
depsdirectory contains the Ansible deployment specifications for all the Aether subsystems. Each of these subdirectories (e.g.,deps/5gc) is self-contained, meaning you can execute the Make targets in each individual directory. Doing so causes Ansible to run the corresponding playbook. For example, the installation playbook for the 5G Core can be found indeps/5gc/roles/core/tasks/install.yml.The Makefile in the main OnRamp directory imports (
#include) the per-subsystem Makefiles, meaning all the individual steps required to install Aether can be managed from this main directory. The Makefile includes comments listing the key Make targets defined by the included Makefiles. Importantly, the rest of this guide assumes you are working in the main OnRamp directory, and not in the individual subsystems.File
vars/main.ymldefines all the Ansible variables you will potentially need to modify to specify your deployment scenario. This file is the union of all the per-componentvar/main.ymlfiles you find in the correspondingdepsdirectory. This top-level variable file overrides the per-component var files, so you will not need to modify the latter. Note that thevarsdirectory contains several variants ofmain.yml, where we think of each as specifying a blueprint for a different configuration of Aether. The defaultmain.yml(which is the same asmain-quickstart.yml) gives the blueprint for the Quick Start deployment described in this section; we’ll substitute the other blueprints in later sections.File
hosts.ini(host inventory) is Ansible’s way of specifying the set of servers (physical or virtual) that Ansible targets with various installation playbooks. The default version ofhosts.iniincluded with OnRamp is simplified to run everything on a single server (the one you’ve cloned the repo onto), with additional lines you may eventually need for a multi-node cluster commented out.
Set Target Parameters
The Quick Start deployment described in this section requires that you modify two sets of parameters to reflect the specifics of your target deployment.
The first set is in file hosts.ini, where you will need to give the IP
address and login credentials for the server you are working on. At
this stage, we assume the server you downloaded OnRamp onto is the
same server you will be installing Aether on.
node1 ansible_host=10.76.28.113 ansible_user=aether ansible_password=aether ansible_sudo_pass=aether
In this example, address 10.76.28.113 and the three occurrences
of the string aether need to be replaced with the appropriate
values. Note that if you set up your server to use SSH keys instead
of passwords, then ansible_password=aether needs to be replaced
with ansible_ssh_private_key_file=~/.ssh/id_rsa (or wherever
your private key can be found).
The second set of parameters is in vars/main.yml, where the two lines
currently reading
data_iface: ens18
need to be edited to replace ens18 with the device interface for
your server, and the line specifying the IP address of the Core’s AMF
needs to be edited to reflect your server’s IP address:
amf:
   ip: "10.76.28.113"
You can learn your server’s IP address and interface using the Linux ip
command:
$ ip a
1: lo: <LOOPBACK,UP,LOWER_UP> mtu 65536 qdisc noqueue state UNKNOWN group default qlen 1000
    link/loopback 00:00:00:00:00:00 brd 00:00:00:00:00:00
    inet 127.0.0.1/8 scope host lo
       valid_lft forever preferred_lft forever
    inet6 ::1/128 scope host
       valid_lft forever preferred_lft forever
2: ens18: <BROADCAST,MULTICAST,UP,LOWER_UP> mtu 1500 qdisc fq_codel state UP group default qlen 1000
    link/ether 2c:f0:5d:f2:d8:21 brd ff:ff:ff:ff:ff:ff
    inet 10.76.28.113/24 metric 100 brd 10.76.28.255 scope global ens3
       valid_lft forever preferred_lft forever
    inet6 fe80::2ef0:5dff:fef2:d821/64 scope link
       valid_lft forever preferred_lft forever
In this example, the reported interface is ens18 and the IP
address is 10.76.28.113 on subnet 10.76.28.0/24. We will use
these three values as a running example throughout the guide, as a
placeholder for your local details.
Troubleshooting Hint
Due to a limitation in gNBsim (the RAN emulator introduced later in
this section), it is necessary for your server to be configured with
IPv6 enabled (as the inet6 line in the example output indicates
is the case for interface ens18). If IPv6 is not enabled, the
emulated RAN will not successfully connect to the AMF.
Note that vars/main.yml and hosts.ini are the only two files
you need to modify for now, but there are additional config files that
you may want to modify as we move beyond the Quick Start deployment.
We’ll identify those files throughout this section, for informational
purposes, and revisit them in later sections.
Many of the tasks specified in the various Ansible playbooks result in
calls to Kubernetes, either directly via kubectl, or indirectly
via helm. This means that after executing the sequence of
Makefile targets described in the rest of this guide, you’ll want to
run some combination of the following commands to verify that the
right things happened:
$ kubectl get pods --all-namespaces
$ helm repo list
$ helm list --namespace kube-system
The first reports the set of Kubernetes namespaces currently running;
the second shows the known set of repos you are pulling charts from;
and the third shows the version numbers of the charts currently
deployed in the kube-system namespace.
If you are not familiar with kubectl (the CLI for Kubernetes), we
recommend that you start with Kubernetes Tutorial.
Note that we have not yet installed Kubernetes or Helm, so these commands are not yet available. At this point, the only verification step you can take is to type the following:
$ make aether-pingall
The output should show that Ansible is able to securely connect to all
the nodes in your deployment, which is currently just the one that
Ansible knows as node1.
Install Kubernetes
The next step is to bring up an RKE2.0 Kubernetes cluster on your target server. Do this by typing:
$ make aether-k8s-install
Note that the Ansible playbooks triggered by this (and other) make targets will output red results from time-to-time (indicating an exception or failure), but as long as Ansible keeps progressing through the playbook, such output can be safely ignored.
Once the playbook completes, executing kubectl will show the
kube-system namespace running, with output looking something like
the following:
$ kubectl get pods --all-namespaces
NAMESPACE     NAME                                                    READY   STATUS      RESTARTS   AGE
kube-system   cloud-controller-manager-node1                          1/1     Running     0          2m4s
kube-system   etcd-node1                                              1/1     Running     0          104s
kube-system   helm-install-rke2-canal-8s67r                           0/1     Completed   0          113s
kube-system   helm-install-rke2-coredns-bk5rh                         0/1     Completed   0          113s
kube-system   helm-install-rke2-ingress-nginx-lsjz2                   0/1     Completed   0          113s
kube-system   helm-install-rke2-metrics-server-t8kxf                  0/1     Completed   0          113s
kube-system   helm-install-rke2-multus-tbbhc                          0/1     Completed   0          113s
kube-system   kube-apiserver-node1                                    1/1     Running     0          97s
kube-system   kube-controller-manager-node1                           1/1     Running     0          2m7s
kube-system   kube-multus-ds-96cnl                                    1/1     Running     0          95s
kube-system   kube-proxy-node1                                        1/1     Running     0          2m1s
kube-system   kube-scheduler-node1                                    1/1     Running     0          2m7s
kube-system   rke2-canal-h79qq                                        2/2     Running     0          95s
kube-system   rke2-coredns-rke2-coredns-869b5d56d4-tffjh              1/1     Running     0          95s
kube-system   rke2-coredns-rke2-coredns-autoscaler-5b947fbb77-pj5vk   1/1     Running     0          95s
kube-system   rke2-ingress-nginx-controller-s68rx                     1/1     Running     0          48s
kube-system   rke2-metrics-server-6564db4569-snnv4                    1/1     Running     0          56s
If you are interested in seeing the details about how Kubernetes is
customized for Aether, look at
deps/k8s/roles/rke2/templates/master-config.yaml. Of particular
note, we have instructed Kubernetes to allow service for ports ranging
from 2000 to 36767 and we are using the multus and
canal CNI plugins.
Install SD-Core
We are now ready to bring up the 5G version of the SD-Core. To do that, type:
$ make aether-5gc-install
kubectl will now show the omec namespace running (in addition
to kube-system), with output similar to the following:
$ kubectl get pods -n omec
NAME                         READY   STATUS             RESTARTS      AGE
amf-5887bbf6c5-pc9g2         1/1     Running            0             6m13s
ausf-6dbb7655c7-42z7m        1/1     Running            0             6m13s
kafka-0                      1/1     Running            0             6m13s
metricfunc-b9f8c667b-r2x9g   1/1     Running            0             6m13s
mongodb-0                    1/1     Running            0             6m13s
mongodb-1                    1/1     Running            0             4m12s
mongodb-arbiter-0            1/1     Running            0             6m13s
nrf-54bf88c78c-kcm7t         1/1     Running            0             6m13s
nssf-5b85b8978d-d29jm        1/1     Running            0             6m13s
pcf-758d7cfb48-dwz9x         1/1     Running            0             6m13s
sd-core-zookeeper-0          1/1     Running            0             6m13s
simapp-6cccd6f787-jnxc7      1/1     Running            0             6m13s
smf-7f89c6d849-wzqvx         1/1     Running            0             6m13s
udm-768b9987b4-9qz4p         1/1     Running            0             6m13s
udr-8566897d45-kv6zd         1/1     Running            0             6m13s
upf-0                        5/5     Running            0             6m13s
webui-5894ffd49d-gg2jh       1/1     Running            0             6m13s
If you see problematic pods that are not getting into the Running
state, a reset usually corrects the problem. Type:
make aether-resetcore
Once running, you will recognize pods that correspond to many of the
microservices discussed is Chapter 5. For example,
amf-5887bbf6c5-pc9g2 implements the AMF. Note that for historical
reasons, the Aether Core is called omec instead of sd-core.
Troubleshooting Hint
If you see failures of the find ens18's netplan network
directory task in the router role, it indicates that
systemd-networkd is not configured as expected. Check the OnRamp
Troubleshooting Wiki Page
for possible workarounds.
If you are interested in seeing the details about how SD-Core is
configured, look at
deps/5gc/roles/core/templates/radio-5g-values.yaml. This is an
example of a values override file that Helm passes along to
Kubernetes when launching the service. Most of the default settings
will remain unchanged, with the main exception being the
subscribers block of the omec-sub-provision section. This
block will eventually need to be edited to reflect the SIM cards you
actually deploy. We return to this topic in the section describing how
to bring up a physical gNB.
Run Emulated RAN Test
We can now test SD-Core with emulated traffic by typing:
$ make aether-gnbsim-install
$ make aether-gnbsim-run
Note that you can re-execute the aether-gnbsim-run target multiple
times, where the results of each run are saved in a file within the
Docker container running the test. You can access that file by typing:
$ docker exec -it gnbsim-1 cat summary.log
If successful, the output should look like the following:
2023-08-09T19:57:09Z [INFO][GNBSIM][Summary] Profile Name: profile2 , Profile Type: pdusessest
2023-08-09T19:57:09Z [INFO][GNBSIM][Summary] UEs Passed: 5 , UEs Failed: 0
2023-08-09T19:57:09Z [INFO][GNBSIM][Summary] Profile Status: PASS
This particular test, which runs the cryptically named pdusessest
profile, emulates five UEs, each of which: (1) registers with the
Core, (2) initiates a user plane session, and (3) sends a minimal data
packet over that session. In addition to displaying the summary
results, you can also open a shell in the gnbsim-1 container,
where you can view the full trace of every run of the emulation, each
of which has been saved in a timestamped file:
$ docker exec -it gnbsim-1 bash
bash-5.1# ls
gnbsim                          gnbsim1-20230809T125702.config  summary.log
gnbsim.log                      gnbsim1-20230809T125702.log
bash-5.1# more gnbsim1-20230809T125702.log
2023-08-09T19:57:05Z [INFO][GNBSIM][App] App Name: GNBSIM
2023-08-09T19:57:05Z [INFO][GNBSIM][App] Setting log level to: info
2023-08-09T19:57:05Z [INFO][GNBSIM][GNodeB][gnb1] GNodeB IP:  GNodeB Port: 9487
2023-08-09T19:57:05Z [INFO][GNBSIM][GNodeB][UserPlaneTransport] User Plane transport listening on: 172.20.0.2:2152
2023-08-09T19:57:05Z [INFO][GNBSIM][GNodeB] Current range selector value: 63
2023-08-09T19:57:05Z [INFO][GNBSIM][GNodeB] Current ID range start: 1056964608 end: 1073741823
2023-08-09T19:57:05Z [INFO][GNBSIM][GNodeB][ControlPlaneTransport] Connected to AMF, AMF IP: 10.76.28.113 AMF Port: 38412
...
Troubleshooting Hint
If summary.log is empty, it means the emulation did not run due
to a configuration error. To debug the problem, open a bash shell on
the gNBsim container (as shown in the preceding example), and look
at gnbsim.log. Output that includes failed to connect amf
and err: address family not supported by protocol indicates that
your server does not have IPv6 enabled.
Troubleshooting Hint
If summary.log reports UEs Passed: 0 , UEs Failed: 5 then it
may be the case that SD-Core did not come up cleanly. Type
make aether-resetcore, and after verifying all pods are running
with kubectl, run gNBsim again.
Another possibility is that you have multiple SD-Cores running in the same broadcast domain. This causes ARP to behave in unexpected ways, which interferes with OnRamp’s ability to establish a route to the UPF pod.
If you are interested in the config file that controls the test,
including the option of enabling other profiles, take a look at
deps/gnbsim/config/gnbsim-default.yaml. We return to the issue of
customizing gNBsim in a later section, but for now there are some
simple modifications you can try. For example, the following code
block defines a set of parameters for pdusessest (also known as
profile2):
- profileType: pdusessest         # UE Initiated Session
profileName: profile2
enable: true
gnbName: gnb1
execInParallel: false
startImsi: 208930100007487
ueCount: 5
defaultAs: "192.168.250.1"
perUserTimeout: 100
plmnId:
   mcc: 208
   mnc: 93
dataPktCount: 5
opc: "981d464c7c52eb6e5036234984ad0bcf"
key: "5122250214c33e723a5dd523fc145fc0"
sequenceNumber: "16f3b3f70fc2"
You can edit ueCount to change the number of UEs included in the
emulation (currently limited to 100) and you can set
execInParallel to true to emulate those UEs connecting to the
Core in parallel (rather than serially). You can also change variable
defaultAs: "192.168.250.1" to specify the target of ICMP Echo
Request packets sent by the emulated UEs. Selecting the IP address of
a real-world server (e.g., 8.8.8.8) is a good test of end-to-end
connectivity. Finally, you can change the amount of information gNBsim
outputs by modifying logLevel in the logger block at the end
of the file. For any changes you make, just rerun make
aether-gnbsim-run to see the effects; you do not need to reinstall
gNBsim.
Clean Up
We recommend continuing on to the next section before wrapping up, but when you are ready to tear down your Quick Start deployment of Aether, simply execute the following commands:
$ make aether-gnbsim-uninstall
$ make aether-5gc-uninstall
$ make aether-k8s-uninstall
Note that while we stepped through the system one component at a time, OnRamp includes compound Make targets. For example, you can uninstall everything covered in this section by typing:
$ make aether-uninstall
Look at the Makefile to see the available set of Make targets.